Loyalty programs are offered by retailers and other corporations as a way to attract and retain customers. Loyalty programs offer rewards, discounts or other special incentives and are designed as a reward for brand loyalty. This module is part of Business Development –> Loyalty Program.
Loyalty Program is divided into two parts i.e. the Loyalty Settings and Points Management. The first part deals with the initial configuration which is needed to get started with the Loyalty Program. Then further you can mange the Points which are allotted to the customer via Points Management. Before this you need to enable “Enable Loyalty Program” setting in Company Settings.
Loyalty Program will always contain a single entry and no new entries can be added to this module.
Loyalty Program Settings
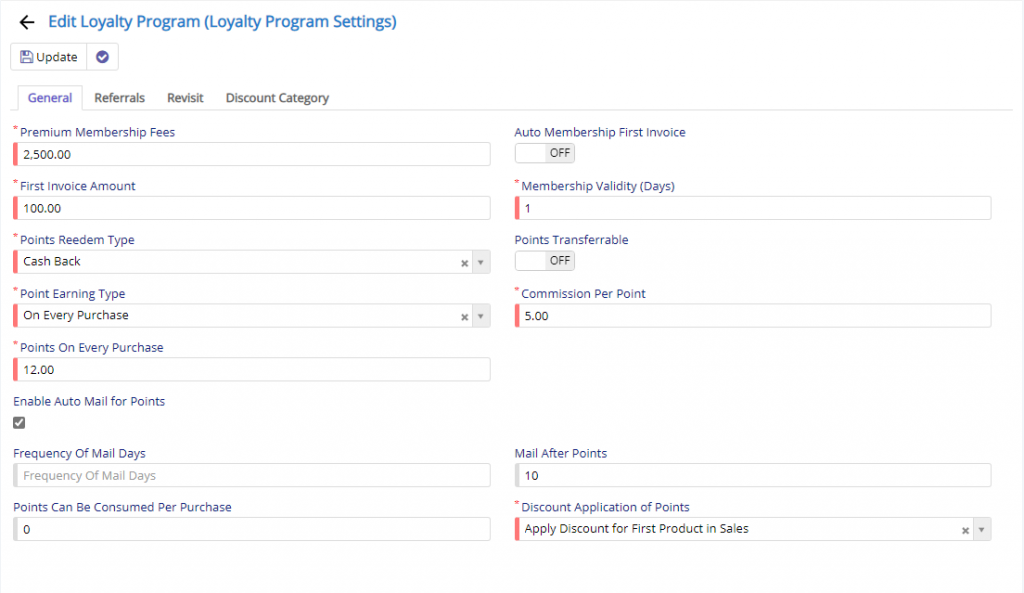
- Premium Membership Fees field denotes the amount required by the client to be paid before he can become a premium member of the entity (Here entity means any outlets, shops, service, etc. where Loyalty program can be implemented)
- Auto Membership on First Invoice while grant the selected customer premium membership.
- First Invoice Amount field denotes the constrain that will be applicable to the customer to become a premium member and if the Invoice amount is equal or greater than the amount specified the customer will be allotted the premium membership.
- Membership Validity in Day(s) denotes the validity of membership that is allotted to the customer. The Premium membership will end when the specified days from the date of allotment is reached.
- Points Redeem Type will set the constrain, that how can the customer redeem his point which he/she has collected. Currently, the possible values are – Cashback, Salon/Existing Services, Goodies or all of the above.
- Points Transferable if enabled, it will enable the customer to transfer the collected points to someone else who is using the current entity.
- Points Earning Type will define how the customer can earn points when he/she does a transaction with the entity. Currently, the possible values are –
- On every purchase – where points will be granted to the customer on every purchase he/she does with the entity.
- Invoice based Amount – which will allot points to the customer based on the amount specified in the Purchase Base Amount field provided. If the purchase amount is equal or greater than the amount specified the customer will get the reward points.
- Commission Per Point will define the commission earned by the Sales person who guides to customer to purchase the right product. So, the now the Sales person will be allotted with the commission points.
- Points on Every Purchase will specify the number of point that a customer can earn when he/she does a transaction with the entity.
- Enable Auto Mail for Points when enabled will send a mail to the customers detailing the points earned from transactions. Now the mail will be sent to the customer when either of the two criteria are met.
- Frequency of Mail Day(s) which will tell the Nafhaa Platform Engine to shot an email to customers with the details for Points.
- Mail after Points will add a level of check for Nafhaa Platform Engine to avoid mails to all customers who have not collected any points yet. When the specified points are reached then that customer will be included in mailing list.
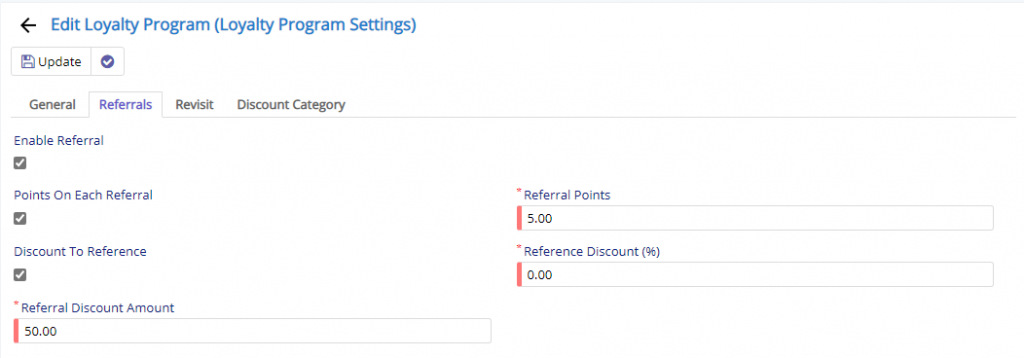
- Enable Referral will enable the Referral code for each customer which they can later share it with their friends or family members. Later they can share the same Referral code with the entity during transaction. Upon successful transaction the referred code which is connected with a contact will receive Referral Points.
- Points on Each Referral will enable the feature where in each use referral code will earn the referrer the number of points defined in Referral Points field.
- Discount to Reference will enable feature of granting discount to referrer. You can define the discount in two ways –
- Reference Discount field will enable you to define discount in the form of percentage.
- Reference Discount Amount field will enable you to define discount in the form of Rate.

- Days If not Visited will define the value where the rewards can be allotted to customer to make him revisit the store.
- Type of Reward which are currently supported are – Cashback, Salon Services, Goodies or all of the above.
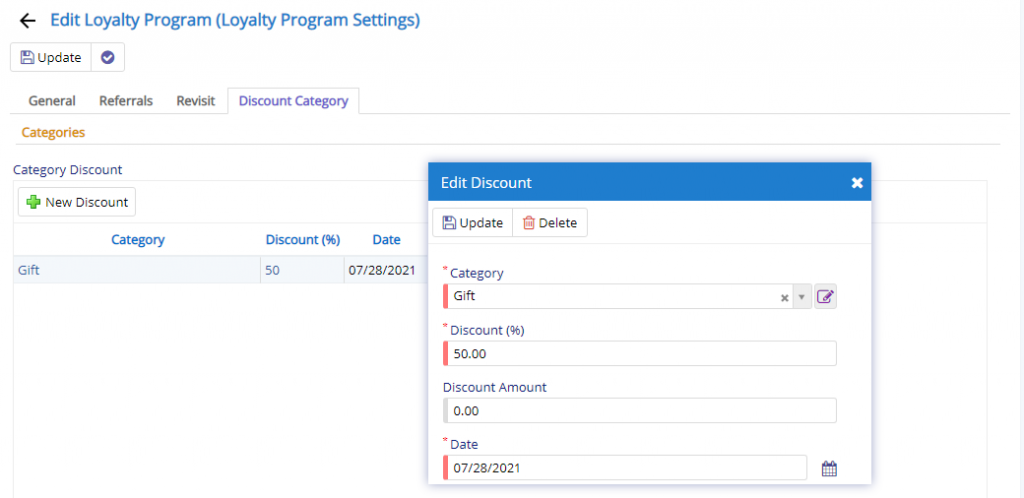
Here, you can define/edit and update the list of categories which your entity supports and with an appropriate Discount percentage or Amount. Then based on the customer type the discounts will be applied during billing.
The next will be looking at the Point Management where you can keep a track of points consumed by the customer in the form Type specified.
Points Management
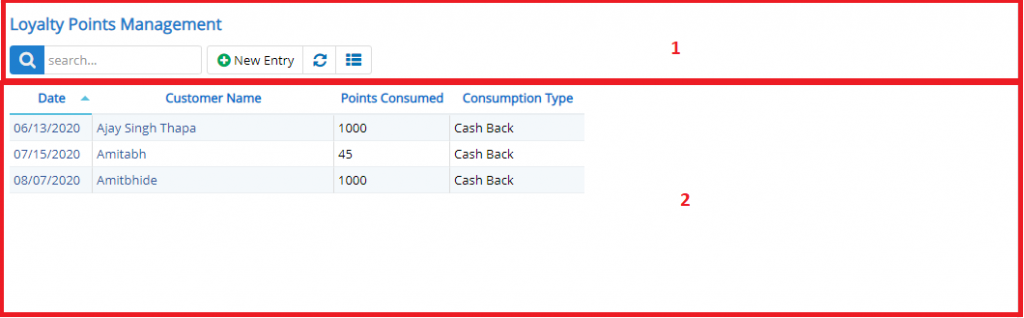
- Annotation – 1 shows few elements like Search, New Enquiry, Refresh and Column Selector (will describe later in the chapter).
- Search Text box is used to search a specify or similar users form the list below. When you start entering characters it will start searching within the Loyalty Program’s Points Management Module.
- Refresh Button is used to reload the Loyalty Program’s Points Management Grid or Table so that the changes which are made to any user will be reflected on the grid.
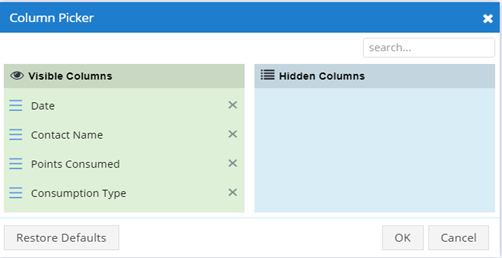
- Column Selector is used to select one or multiple columns from the range of columns. Following is the image for the Column selector. Note – The columns shown in the filter will keep on changing as and when Nafhaa Platform makes changes to the module.
- Annotation – 2 shows the list of all the Loyalty Program that have been created where the user can click record to open it and edit it if needed.
- Starting from the left is the Update button which is used to update the changes that you have performed. This button will change to Save when you are creating a new Entry.
- The Next button which is similar to Update button but the only difference is that, it performs the Update operation and remains on the same page. But the later Updates or Save and returns to the Grid displaying List of users. This button will change its meaning when you are creating a new entry. It will be called as Apply changes.
- The Next button is for Delete, this will delete the selected record from the database.
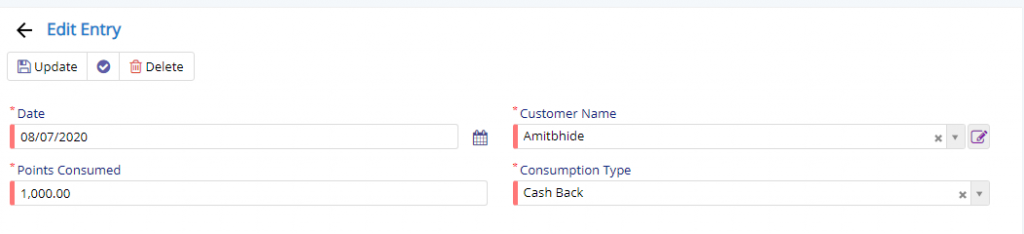
Here you can see the Date of Points redemption done by the customer. Next you need to set the customer’s name who consumed the points that were collected. The last two fields are those where you will specify the points consumed and type of consumption. The Type of consumption can be – Cashback, Salon Services, Goodies or all of the above.
Enhancements (Apr-2022)
- If customer is premium member and validity date is greater than sale, then while creating sale invoice auto entry done in points management for that customer. To identify this remark field is added in points management module.
- As mentioned in previous sections the total discount given to customer is against the Points Used in sales transaction. In Sales Invoice Points To Use and Points In Balance, both are shown. Points To Use is open field where the user can enter the points manually. And that much amount treated as Overall Discount for the invoice.
This sums up the Loyalty Program Module. We hope that you have fair bit of knowledge on how to use and handle the Loyalty Program Modules.