Now that you have taken the first step by Logging in to Nafhaa Portal we urge you to create users so that each work is distributed across the users. Please note – You can add only the number of users that you have purchased and this is applicable to both Active and Non-operational users. To increase the number of users you need to connect with the support team for further discussion.
Following, is the User Management window which is the most critical of all as it will affect the visibility of data across Nafhaa Platform.

You can open the User Management window by navigating to Administration –> User Management. The option which we are talking here is marked in the image. The other options which you see will vary based on the Modules you have opted and rest all will be hidden. Moreover, all options or menu items are permission based and will be visible to only those users who are granted with the permissions. A point worth noting here is “admin” can view all the Menu items be it a Main menu or sub-menu.
Having, said that now let us look into the User Management window or page which will show all the details. Following is the page for User Management.
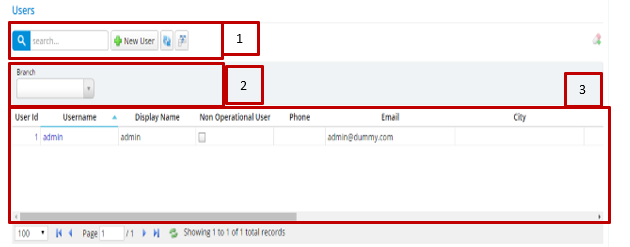
The User Management is divided into 3 Section and every section is very important to understand to manage the users.
Annotation – 1 shows few elements like Search, New User, Refresh and Column Selector (will describe later in the chapter).
Search Text box is used to search a specify or similar users form the list below. When you start entering characters it will start searching within the User Management Module.
Refresh Button is used to reload the User Management Grid or Table so that the changes which are made to any user will be reflected on the grid.
Column Selector is used to select one or multiple columns from the range of columns. Following is the image for the Column selector. Note – The columns shown in the filter will keep on changing as and when Nafhaa Platform makes changes to the module.
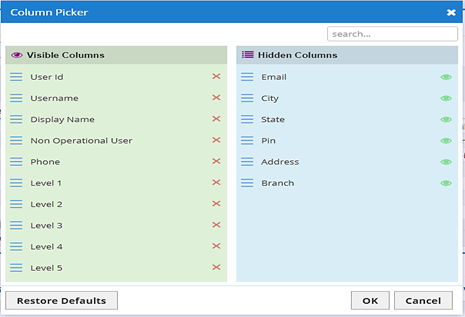
This window will be shown when you click Column Selector button. Here you will be able select which column you want to see on the grid. To view a column in Grid just click the Eye button and click OK. Similarly, if you want to remove a column just click X button and click OK and it will be removed from the Grid.
Annotation – 2 which deals with filters and the position it is always reserved for filters across the Nafhaa Platform. Here, you will get numerous drop-downs from which you can filter out the entries form the Grid. In User Management, currently, we have only one filters but we can add filters if you want for that you need to connect with the Support team for further guidance.
Annotation – 3 which contains the clickable grid to Open an entry and this operation is same across Nafhaa Platform.
So, we hope that you have got an overview of the User Management Module and so now let’s delve deep into this module like how to Create, Update and Delete users and many more things. The next thing we are going to do is the explain the details of each Annotation blocks.
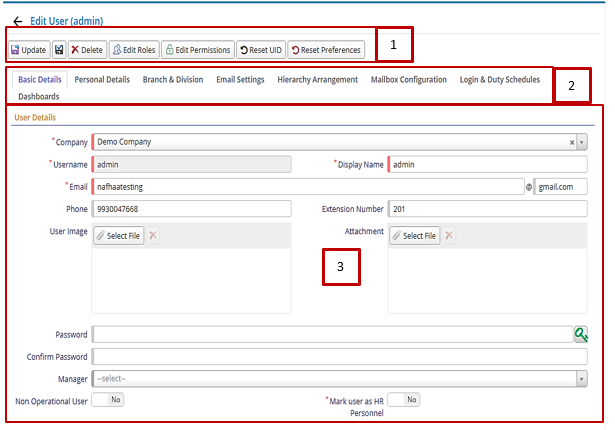
Annotation – 1 block contains various functional buttons which have their own functions which will be performed when you click the buttons.
Starting from the left is the Update button which is used to update the changes that you have performed in any of the Tabs as show in Annotation – 2.
The Next button which is similar to Update button but the only difference it that, it performs the Update operation and remains on the same page. But the later Updates and returns to the Grid displaying List of users.
The Next button is for Delete; this will delete the selected record from the database.
The Next button in the row is the Edit Roles which invokes a new dialog box where you can set the permissions for Roles. For more details refer Chapter – 3. Roles are like a collection of Permissions directly assigned to the number of users in single click. If Roles concept never existed then it would have been a nightmare for the Admin to assign permissions. With Roles it has become easy to assign permission to the user.
User Permissions
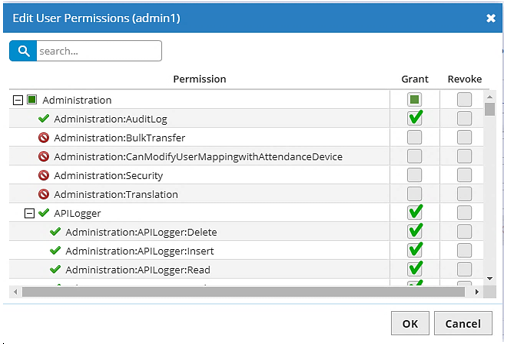
Next important buttons in the row is the Edit Permissions which will invoke the following dialog for assigning permissions to the users. To assign a permission open the specific user from the Grid and then click on Edit Permissions.
As we can see the image, we are editing a user named admin1 which is a different user other than main user admin.
The grid has three columns viz. Permission, Grant and Revoke. Each of them has their own importance.
Permission column lists all the permission which are available based on your availability of modules. Now, each permission can have either of two state i.e. Grant or Revoke.
As you can see the image, permissions which are granted are marked in Green Checkmark to the left side of the permission and those for which no Grant or Revoke permissions are assigned are marked with Red Stop mark to the left side of the permission. The Revoke type will come in to picture when you want to explicitly deny a permission to a user. You can also search a permission within a module using the search box at the top of the dialog.
When assign or revoke a permission and press OK button the changes are automatically saved for the selected user and you don’t have to update the user explicitly at the end.
Reset Preferences and UID
The Next button in the row is Reset UID which is used to reset the user device on which is accessing the Nafhaa Platform. Now the device could be a Computer, Mobile, etc. This is mostly used when you are punching your attendance using a Mobile or other handheld device.
The last button in this row is the Reset Preferences which is used to reset all the UI/UX preferences of the users. Now a question arises What do we mean by UI/UX Preferences? The answer is pretty simple, refer the image above for User Grid where columns are positioned as is. The user has the flexibility to re-order the columns based on his/her needs and the same will stored as a part of preference to the specific user. Preferences also includes Language settings, etc.
Annotation – 2 block contains number of Tabs which have various details to be filed if needed. Now let us go through all the Tabs one-by-one.
The First Tab is Basic Details, the name is self-explanatory which deals with the basic information of the user. Following is the image for the tab.
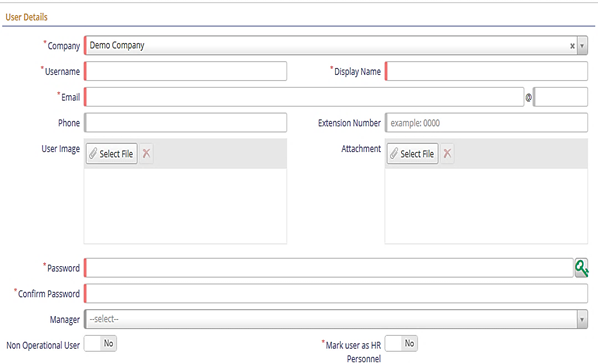
As you can see this tab entirely deals with the user’s basic information. Fields which are marked with * mandatory fields and they need to be filled in before saving the User. Company drop-down will be shown only when it is enabled in Company Details Settings page. You have to set the password for the user or you have the option to generate the password automatically using Key icon at the right side of the textbox. Finally, at the bottom we have a Yes/No Control switching which make the user Non-operational which means, the user can no longer have the permission to login to the portal.
The Second Tab is part of Personal settings which deals with other information of the user and can be treated as Basic Settings.
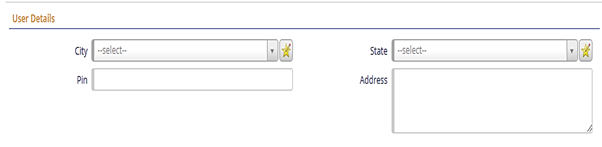
These are not mandatory but settings up these values will make user look up-to date.
The Third Tab deals with the Branch, Designations and other aspects of the users. Following, is the image for the same.
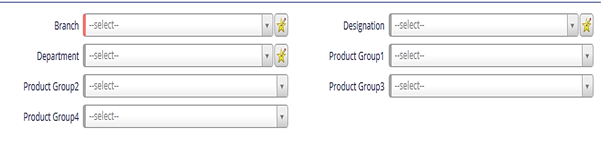
As you can see above, the user can be categorised based on the Branch this will ensure that the user is connected with the selected branch. Well, now every user has a designation through which he can be identified on which post he is working. Designations and Departments are the part of Masters (These will be explained later). Product Group 1 to 4 which acts like a filter will filter out the products and can view only those products which fall in those categories. This ease the operation to find a product from a large list of products.
The Fourth Tab is all about Email Configurations which is need to send mails right from Nafhaa Platform to other users or Clients. These settings are very important is intend to send mails from Nafhaa Platform. Wrong configurations may lead to issues while sending an email. These settings are provided by Email service provider kindly connect the respective provider for the settings.
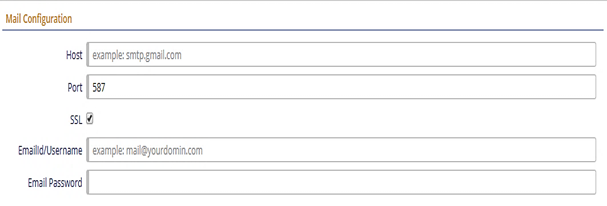
Very few fields to configure yet important to do them correctly.
Host – This field refers to the server name where you emailing service is hosted. It usually, starts with smtp. Then we have the Port field which contains a simple number which Nafhaa tries to connect to, to send the mail after finding the server. SSL denotes the security that the remote email server provides. If the remote email server supports SSL then you should mark this field, else un-check the field. The next two fields are the conventional email login credentials like the username and the password.
If everything goes well you should be able to send mail form Nafhaa Platform. For some reasons, if you are not able to send an email from Nafhaa try configuring Thunderbird or Microsoft Outlook using the same credentials. If, the credentials are working then check with settings you added to Email Settings, even if this method doesn’t resolve the issue try connecting with your service provider to get the issue resolved.
The Fifth Tab deals with the most important aspect of User Management i.e. Hierarchy Management. This will set up the scenario where the user will be able to view the content of other users who are under them. Admin on the other hand can view all the records irrespective of the hierarchy. Following the image which show the Hierarchy Management tab.
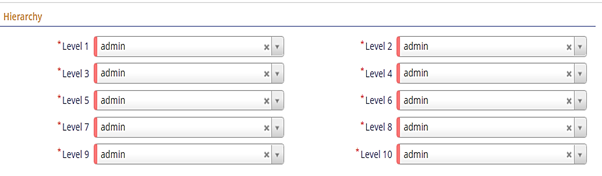
You have ten level at your disposal where you can set the hierarchy who can see what in simple language. The highest level in number 10.
The Sixth Tab deals with the Mailbox Configuration and it is used to send or receive emails right into the Nafhaa Platform. Each mailbox provider has their own settings, please refer their individual documentation for settings.
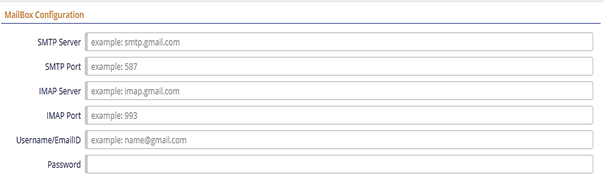
It is very much the same as shown in the Point – d above. The only difference are the two fields named IMAP Server and Port number.
The Seventh Tab deals with Logins and Duty Operation of user. When the user can login and how much time the user works at the office place.
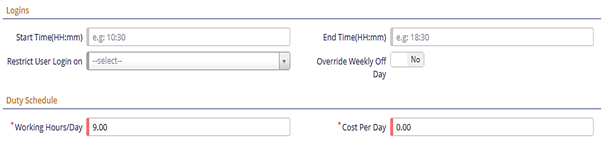
Login details contains Start Time and End Time fields as this will help in adding a restriction to the user when to login to the portal. User can be restricted to login on certain days by selecting the day from the drop-down. There is another setting here using which you can over-ride the Weekly off Login so that he can login on off days.
Moreover, each user has a working Hours/Day which is set to 9 as default but can be changed if needed. The next field is cost per day, this field can be set with the value that an employee aka user incurs to organization per day.
The Eighth Tab deals with Dashboards. Some dashboard needs user level settings to be enabled.

This setting will allow the user to receive or make call using IPBX connected to Nafhaa Portal. For IPBX integration, connect support for more information.
Alternate Landing Page will allow user to set new Landing page other than Dashboard Page. Additionally, when “Enable Alternate Landing Page for User(s)” Is enabled then each user will be able to set his preference of landing page via Dashboard.
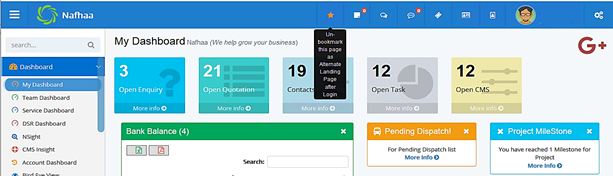
You will get Bookmark star on the dashboard to enable you alternate landing page. Once set the Star will turn Orange when you are on the Bookmarked page else it will Yellow ready to be bookmarked.
This covers up the entire User Management module.