Now, that you have started using the CRM and completed the basic of User Management and User Roles. Now, let’s focus on the day-to-day activity modules like the Contacts Module which deals with the Clients or the customer you deal with during your business. A contact can be an Individual, Organization, etc. and later these contacts can be referred in any module that you have opted for such as Sales, Sales Order, Purchase, Purchase Orders, Invoice aka Proforma, etc. are few to name. Contacts can be directly access from the Main menu.
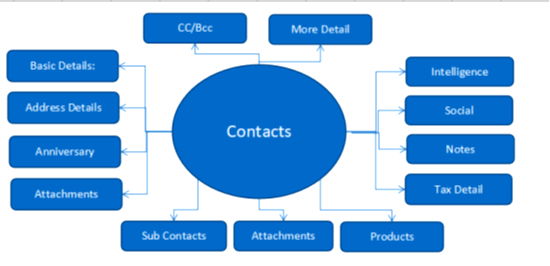
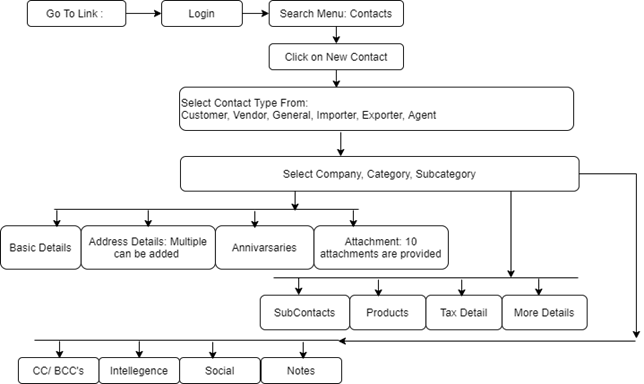
Following is detail diagrammatic structure of Contact Module to give you a brief idea.
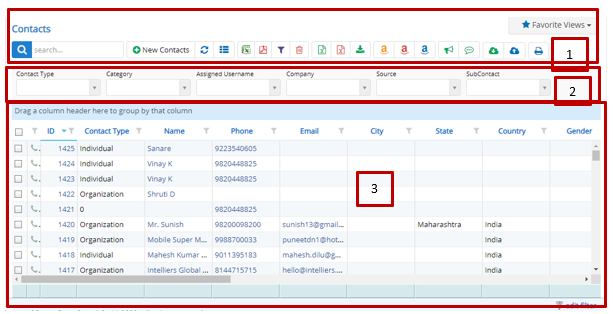
Annotation – 1 as you can see there are lots of buttons and each button have their own purpose. Some of them are permission based so, some them might be visible to one user and may be hidden for others. If you can’t see a button then you might have the permission to perform that action. You can consult your admin for the permission to perform that activity. We are repeating the details of the default button which are provided by Nafhaa platform to maintain the continuity while reading.
Search Text box is used to search a specific or similar contact form the list below. When you start entering characters it will start searching within the Contact Module.
Refresh Button is used to reload the Contact Grid or Table so that the changes which are made to any user will be reflected on the grid.
Column Selector is used to select one or multiple columns from the range of columns. Following is the image for the Column selector. Note – The columns shown in the filter will keep on changing as and when Nafhaa Platform makes changes to the module.
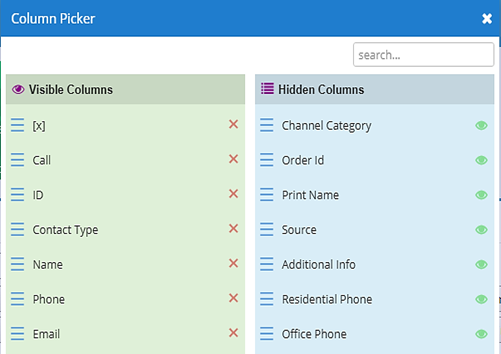
The image shown is exhaustive as it contains many columns and all of them cannot be included here.
The next two buttons are for downloading the Contact Grid as Excel or a PDF. These files will contain all the columns are which are visible in Contacts Grid.
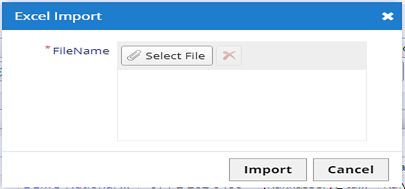
The Next button will used to upload multiple contacts using an Excel file provided by Nafhaa Platform. You can download the format by clicking the Formats button as shown in Figure – 1. If you have some trouble understanding the format you can always connect to the Nafhaa support team and they will happily help you out in the understanding the formats. Now when you are ready with the Excel file with the chosen format you can click the Contact button to upload the same and you will be provided with the following window.
Once, the upload is done you will be notified with the details of operation. Please note that Nafhaa Platform has restricted 500 records per Excel file to avoid congestion on the Nafhaa Platform as there are many other users and clients using the platform.
The Next button will used to upload multiple sub-contacts using an Excel file provided by Nafhaa Platform. You can download the format by clicking the Formats button as shown in Figure – 1. If you have some trouble understanding the format you can always connect to the Nafhaa support team and they will happily help you out in the understanding the formats. Now when you are ready with the Excel file with the chosen format you can click the Contact button to upload the same and you will be provided with the following window.

During upload, new entries will be created if the record doesn’t exist, but they exist they will be updated. Once, the upload is done you will be notified with the details of operation. Please note that Nafhaa Platform has restricted 500 records per Excel file to avoid congestion on the Nafhaa Platform as there are many other users and clients using the platform.
Then we have an important but devastative button named Bulk Delete which need to be used very cautiously. Using this will delete the selected contacts from the list. You need to select the contacts by selecting the checkboxes given on the left side of each record. If the contact is used i.e. If the contact is referred in Sales, Sales Order modules etc. it will not delete the contact and show you proper response as show below.
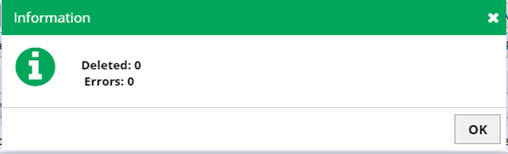
Those which are referred will be categorized under Error and the reset will be categorized under Deleted.
The next three buttons – Amazon Import, Amazon FBA Import & Amazon Dubai Import are customized operations for those customers who deal with Amazon i.e. sell across Amazon platform. Amazon Import will be used to upload contacts which are collected via Amazon portal, next option Amazon FBA Import is also very much similar to first and finally Amazon Dubai Import is for transactions done using Amazon Dubai. More explanation can be obtained via Support team if you opt for this option. Detailed explanation is beyond the scope of this chapter.
The next button is for MailChimp using which you run marketing promotions using MailChimp Platform. More detailed explanation will in the Chapter named MailChimp. For more information, you can check with MailChimp portal – https://mailchimp.com/
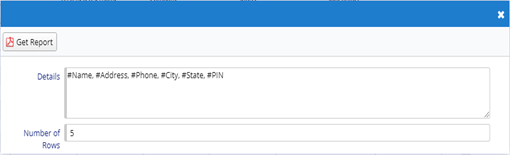
The next button is for Bulk SMS which is used to send promotional SMS to the selected customers. To select the customers, we have given a checkbox to select the same. There might be some keywords included which we expect the user not to remove those. Now, the question arises “What are keywords and how to identify them?” Keywords are those which start with # for example – #customername. But when you send SMS the keywords will be replace with appropriate values. Following is the dialog which will appear where you can add the details for SMS.

The next button is for downloading Formats which will redirect to a new page where you can download the format which you need.
The last button in this module is for Label Printing which is used to print stickers for the selected contact (one at a time) so that you can use to stick it on your packages. When you select a contact and click on Label Printing button you will get the following dialog.
Annotation – 2 contains all the filters to filter out the unwanted records so that you can focus on what you want to see.
Annotation – 3 shows the actual grid where all the records are displayed. Upon clicking the row, you can edit the record and save it. We have introduced new Excel type sorting and Grouping where you can drag a column to Group it.
Now, that we have the overview of the module lets go inside the module and explore more about it. Before going into this module, we need to look at the part of settings related to this module in Contacts Settings.
Now, let’s delve deeper in this module by actually seeing what we have in the store for us.
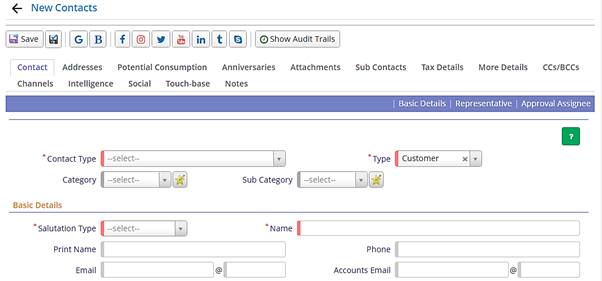
- Contact tab shown above lists all the field which are essential to identify a contact while doing the business. The fields displayed are quite self-explanatory and many of them have been explained in the above paragraphs.
- Addresses tab provides an option to add additional address for the contact if any.
- Potential Consumption we allow the user to specify the consumptions of products for each contact based on their invoice generated against the products which are purchased.
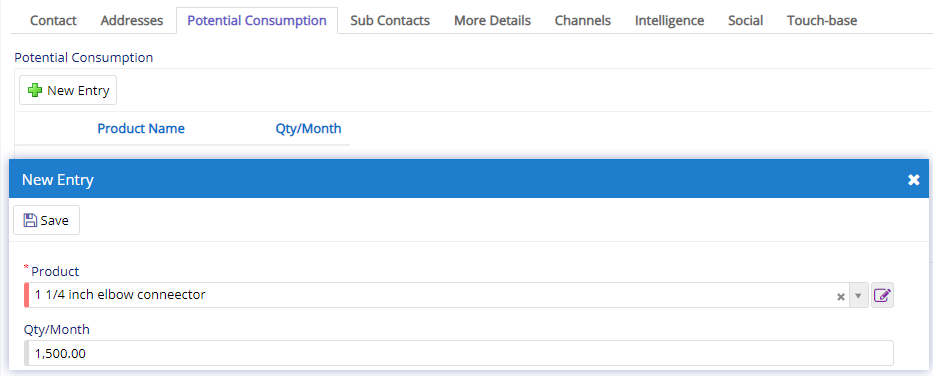
User will need to enable the required settings from Contact settings to enable this tab. Here, user can specify the total quantity that is consumed during the month time.
- Anniversaries tab used store Birthday, and other types of anniversaries so that you can wish the client on that date.
- Attachments tabs used to store some other information other than one which is filled in contact’s page. There are total six attachments that you can use to store data.
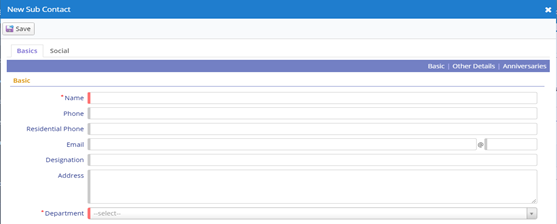
- Sub-Contacts tab is used to store information related to person who is connected with the primary contact in one or the other way. A sub-contact can be associated via different department in the primary contact’s company. You will get the following window for adding sub-contacts. Image shown below contains only few fields but there are more in the dialog some of them are required and some are not.
- Tax Details tab contains all the tax relate fields such as GSTIN, etc. are few to name.
- More Details tab which contains details like Grade, Area, Customer Type, Bank Details, etc. are few to name.
- CC/BCC tab which is used to send the Emails to CC/BCC which are defined.
- Channels tab lets you define the type of Channel partner your contact belongs to. This will help you identify the contact while doing business.

- Intelligence tab is where you can set the contacts details such as Yearly turnover, Infrastructure type, No. of Employees, Industry Type, etc. are few to name.
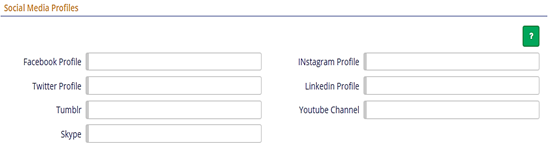
- Social tab is where you define the links and channels for the customer or the client you are saving. This help you to under your contacts presence in social media. Once these are saved then you can access the same using the social media buttons provided over the top in contact’s page. Refer Figure – 52 for more understanding.

- Touch-base tab details will allow the user to specify the details related to follow-up that are required for the customer. It could be in any format or mode.
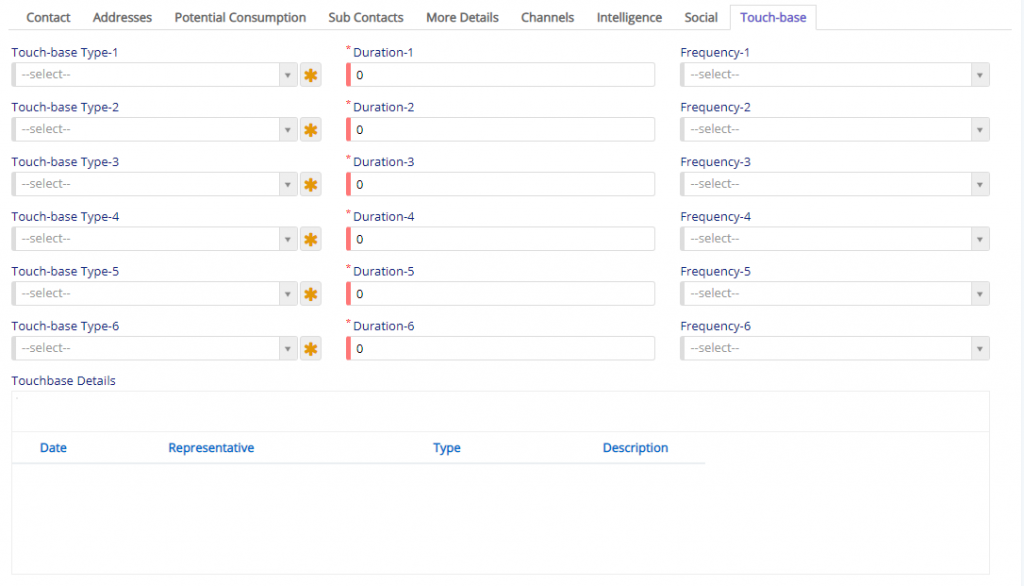
Here, the user will have to specify the type of touch-base which are applicable to the customer. Touch-base types can be set or defined using the star button. The duration field will allow the user to specify the value for an activity that is to be performed and finally, the frequency will allow the user to specify the occurrence for the same.
Finally, at the bottom, we have a log table that will record all the touch-base points that have been handled by the representatives along with date and other descriptions.
- The notes tab is used to save some additional notes for the contact.
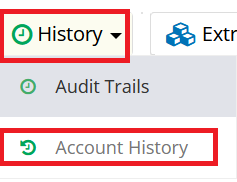
- The Audit Trail button(Under the History) is used to show updates that were made on this contact over the period of time.
- The Account History button under the History button(as shown below image viz: Image 1) – This shows the account history of the selected contact, it will show all the briefing of transactions done with the contact. The following image shows a sample of the Account History report.
Flow of Contacts Module in Nafhaa Platform
This sums up the Contacts Module. Hope you have understood the module.